Monday, September 26, 2016

Paper Bound


Recently we have looked at a number of ways that the Samuel A. Bemis papers were written, folded, sealed, mailed, unfolded, refolded and bound with red tape. Another common method we have found of collating the papers was to sort them by subject and then wrap them with a paper binder.


If you look closely at this paper wrapper for example you can read “Bills & Rec.t of 1841.” Rec.t is an abbrevation of receipts.
On the back you can see evidence of red wax used to adhere the wrapper together. Other writing on the paper indicates that Bemis “recycled” old letters, perhaps older draft versions, to make the paper wrappers.


Here is another example from 1857.  


He used another type of paper wrapper to collate some of his cancelled checks together.


On the back he did some of his calculations.


These small details about how papers were sorted, collated and bound help give us insight to the 19th century world.


Monday, September 19, 2016

Red Tape


As we all know, Little Jackie Paper gave Puff strings and sealing wax. We covered sealing wax in a previous blog. Now let's look at strings.  


As we process the Bemis papers, we have found a variety of strings used to bind papers together so they would fit in pigeonholes in historic desks. 


If we look carefully at the “red tape” used to bind some of the papers, we can see how they were made. The sheen of the material suggests it is linen made from the fibers of the flax plant. The threads have been dyed various shades of color before being woven. 


To understand how the tape was woven we can turn to the portrait of Mr and Mrs Thomas Mifflin (Sarah Morris) by John Singleton Copley. 1773 at the Philadelphia Museum of Art.


A detail of the painting shows a “tape loom” of the period. You can see the “shed” created with the shuttle that allows a “weft” or thread passed back and forth to form the tape.


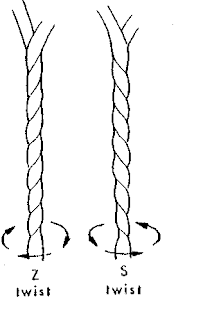
The magic of digital scanning allows us to click on the photo and enlarge the image to the point where you can actually see way the fabric was woven and the "selvedge" and "Z" twist of the thread.


Here you can see the string on the other hand is an "S" twist.


Monday, September 12, 2016

Pigeonholes


Building on our recent post about “strings and sealing wax” let’s continue to review and expand our exploration of a single, seemingly simple, historical artifact, a letter in the Samuel A. Bemis collection.  


Earlier we explored the red wax seal that was broken to open and read the letter seen in the picture above. Now we are going to look at how the letter was folded so the back of letter would serve as its own envelope and to provide physical protection and privacy to the contents of the letter. Then after the letter was read, the paper was refolded in a different way so it could be "pigeonholed" (filed in an organized system). Notice we haven’t actually gotten around to reading the letter or even seeing who it was from. We will get to that later. At this point we are more interested in the context than the text.

In this 1758 painting of Bostonian Thomas Greene by John Singleton Copley at the Cincinnati Art Museum, you can see examples of a letter on the desk folded and sealed in a similar way. You can also see another letter in his hand unfolded to read.  


This method of folding and sealing provided a level of privacy and security to the letter. When folded this way it was hard to sneak a peak at the contents of the letter without breaking the seal. It also provide a functionality in which the back of the letter served as the “envelope.” If you look again at the letter, you can see the darker area of the paper that was exposed to the environment outlined in red in the image below.


Here you can see the order in which the sections of the paper were folded.


Here is how the address section of the "envelope" would have looked.


After the letter was read it was refolded in a different way so it would fit into a pigeonhole in a desk. First the letter was turned upside down.


 Then it was folded in four parts to a "pigeonhole" size.


Then it was labelled with information so it could filed away and retrieved later. (see the wording in the green box below)


 So it would have looked like this.


In this case,

Seems to read

Letter dated 8th Dec. 1836

From

Doct. L. F. Gallup
Dentist


A quick internet search finds a reference to a L.F. Gallup Dentist during the period.

Now the letter is ready to be filed in a "pigeonhole" in a desk to physically protect the papers and sort and organize the papers into categories. The desk would also provide additional layers of security for privacy and security. Inside the desk and bookcase sections of this furniture were many shelves, drawers, and compartments. The desk part seen below has six pigeonholes.


The stacks of these letters/papers were bound with paper bands, red tape or even straight pins so it would fit in the most common furniture filing system, the pigeonhole. This traditional system has led to the common social use of phrases such as:
Cut through the Red tape
Brass tacks
Pigeonhole something away
Put a pin in it

Next time we will look at these various ways of collating papers.


Thursday, September 1, 2016

Of strings and sealing wax and other fancy stuff


Evidence of special strings and sealing wax can be found throughout the Samuel A. Bemis papers we are processing at the Conway Public Library's Henney History Room.  


In fact, some of the evolution of various binding and sealing systems for writing, sending and organizing papers can be seen in the collection. 

MIT conservator Jana Dambrogio coined the term “letter locking” to cover the wide range of techniques used over the years to provide privacy, security and authenticity to the written word. It will take a couple of blogs to cover even a tiny bit of this vast subject and continue to examine the material context of the papers themselves including paper format, color, binding, seals, etc. 

We have already covered the grains of sand we found among the collection and at least one of the watermarks and use of string to bind a booklet in previous blogs.
There are relatively few examples of the use of wax seals in the collection. There are many more examples of the use of wafers. Let's look at the difference.

Sealing wax like that seen in red in the pictures below was made from beeswax, lac or rosin mixed with turpentine and pigments and shaped into a taper, like a small candle.


The wick was lit and the wax melted onto the paper, then a metal seal or signet ring was pressed onto it to create a design in the wax, often initials or coat of arms or other insignia.


In the Bemis papers most of the wax seals seem to have been plain.


There are many works of art that show the history of strings and sealing wax. This painting of Samuel Adams shows an example of a very large seal. 


This one from the Bemis collection has a "waffle iron" pattern.


The “waffle iron” pattern seen in this seal was later used in the wafer form.  Wafers were a cheaper and quicker alternative to the sealing wax. They were made from a starchy flour paste that became sticky when wet and were pressed or pinched together with a pair of "wafer tongs."


Both sealing wax and wafers were available throughout the life of Samuel Bemis and there is evidence to suggest that proper etiquette as well as cost and convenience may have guided which system was used when. 

 The “waffle iron” pattern can also be seen on the flap of an envelope showing three different versions of this design. 


So how did one learn all of this about letter writing? Well you could be schooled on School Street by Miss Frost!


As always, for any questions or suggestions, or to find the sources of images or quotations from this blog you can "comment" us or contact us at the Conway Public Library's Henney History Room.